Material Stock-take Method 2
Overview:
There are 3 methods of managing stock in Opto, and prior to adopting one of these methods, the user should contact OPTO Support Desk to ensure that they are using the best method for the company environment. Opto suggests that before the stocktake is commenced that all materials for existing orders/jobs be picked &/or issued and that any available material deliveries be completed.
- Method 1. Stock in /out – Will show material usage in reports
- Method 2. Stock Adjustment – Will not show material usage in reports
- Method 3. Stock-take – Which can be either a full or partial process to audit stock balances
Note: The following procedure is for Method 2 only- ‘Stock adjustment’.
To assist with the preparation and execution of the physical stock-take the following procedures have been compiled as a guide only and should be used with the company’s existing stock-take procedures. The accuracy of any stock-take is a result of good planning, coordination and discipline.
There are four steps to this process:
- Step 1 – Prepare for stock-take
- Step 2 – Physical stock-take (all transactions have to be completed)
- Step 3 – Enter the count ‘total on hand’ after stock-take
- Step 4 – Review Stock-take data
Check the current on hand materials before the stock-take.
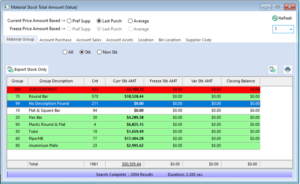
At any time, the user can view the current stock on hand by clicking on the ‘Material Stock’ icon on the INVENTORY tab on the OPTO ribbon and click on the Refresh button, to generate the data. This window will show the current stock amount of each Material group. For this procedure (stock adjustment), ignore freeze and variation columns as they do not apply to this procedure. The green highlight rows are the ‘current on hand’ figure and the red are for any item with negative on hand figures. Note the material data can also be viewed by Asset Group, Location, Bin Location and Supplier Code.
On the day of the stock take
An important aspect of the stock take procedure is to Freeze the material stock, allowing for a snapshot of the inventory stock currently in the system.
The following steps show a generic process for freezing the stock.
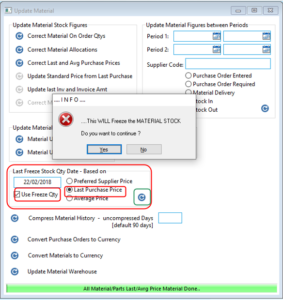
Open the INVENTORY tab and select the ‘Utilities’ drop-down and select Update Materials from the list.
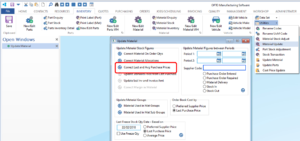
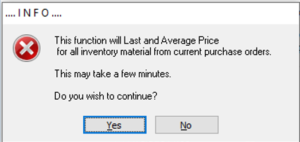
Click on the Update icon circled next to ‘Correct Last Purchase and Average Purchase Prices’ and answer Yes to the pop-up message.
A message appears at the bottom of the Update Materials window to alert that the update is complete, click on OK in the ‘Update Done’ message.
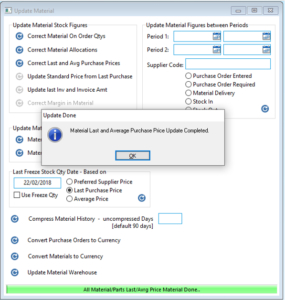
In the “Last Freeze Stock Qty Date-Based On” area as shown below,
- Ensure that “Use Freeze Qty” Box is ticked.
- Click on the “Last Purchase Price“ radio button to select
- Click on the Update icon (circled green) to run update
- A message appears when the update is completed.
One of the great features of OPTO’s Method 3 Stock Take – with freeze – is that as soon as the stock take count has been done, stock movements in the operation can recommence.
- The stock freeze allows the user to adjust the stock later because it will calculate the variation based on the freeze qty and then take into account any stock movements.
- The key point here is, if the user are responsible for entering the results of the stock take into OPTO Stock In/Out fast when it is in stock take mode, the user should only be interested in the actual on hand total that is on the stock take sheet. The user must ignore “adjustments” and just establish what the TOTAL on hand figure is. This is what the user enter into OPTO and nothing else.
Step 1 – Prepare for Stock-take
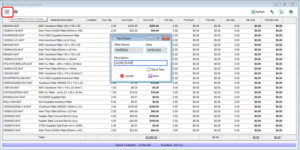
Open the INVENTORY Tab and click on ‘Material Stock’ icon to open the window and click on the Refresh button to generate the material groups data. Dbl-click on the a material group to display all the materials in the selected group. Click on the icon (circled below), to open the ‘Save Query, enter a description for the query, and save the query by clicking on the Save button. The Stock Take tick box is option and if ticked will flag the query as Stock Take in the saved query list.
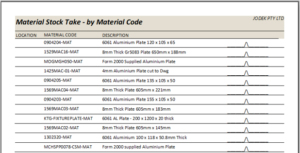
Now that the USER has saved the material query for the group, they can now print the “MATERIAL – Stock-take” sheets.
Click on the Print button and select Yes to the message.
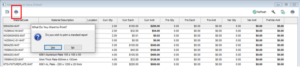
The Run Report (OIBRW) for Table – MATERIAL window opens, if the window is blank or doesn’t display Stock Take reports required click on the Add button and scroll to the list to find the report name. Click on the Report name to highlight and give the report a name then click OK. Click on the Print button to preview the report.

Click on the Print icon.
Step 2 – Physical Stock Take
Ensure that the user has established CLEAR CUT-OFF POINTS prior to commencing the physical count.
- Ensure that all purchase orders have been received and the deliveries entered into the system before proceeding with the stock take. All Stock should be clearly marked to confirm whether the Material is to be counted in stock or Post stock delivery (received after cut-off).
- Ensure that all PRODUCTION movements are completed: ie, All stock physically picked for WIP has had the corresponding transaction completed in OPTO.
- Ensure that all Sales/Factory orders are despatched in the system and clearly quarantined prior to conducting the physical count.
Step 3 – Enter the Stock-take count
The following steps are a guide to process the total stock on hand figures.
- Open the INVENTORY Tab,
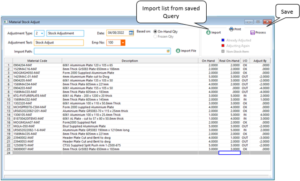
- Click on the Utilities drop-down and select ‘Material Stock Adjust’ from the menu.
- From the ‘Stock In or Out Type’ pop-up list, ensure to click on “2 – Stock Adjustment” to highlight and click on OK.
- Enter the Date, Adjustment Text and then your Employee Number.
- Click on the Import icon and click on one of the query(s) saved in Step One. The material group queries are selected one at a time.
- Use the information recorded on the stock-take sheets to enter the stock totals only. Keep in mind the following when entering the figures recorded during the physical stock-take:
- Enter the quantity recorded on the stock-take sheet into the “Real On Hand” column noting that OPTO will perform the correction automatically.
- Any zero quantities recorded during the physical stock-take must have a ZERO typed into the “Real On Hand” field. OPTO will not automatically zero stock in this window.
- OPTO will display whether the material stock is being moved IN or OUT of stock, and by the amount of the adjustment and print if required.
- Save the Stock-take count by clicking on the Process icon, you will get are message to confirm so click on Yes. Then another message will confirm the stock adjustment count has been updated.
- Use the stock take sheets to enter the stock totals in the “Real On-Hand” column, the “Adjust By” column will generate automatically. Please keep the following in mind when entering the quantities as recorded during the physical stock take:
- Any zero quantities recorded during the physical stock take must have a ZERO typed into the “Real On Hand” field. OPTO will not automatically zero stock in this window.
- OPTO will display an indicator as to whether the material stock is OK or OUT, depending on the quantity entered.
Save the Stock Take Count by clicking on the Save button (Blue disk icon), click Yes when prompted to save stock adjustments and click OK to the complete. Reports can be printed by following the prompts.
Step 4 – Review Stock-take Data
The variance in the material stock, as adjusted in the Material In / Out FAST window, can be reviewed by opening either the Material Stock or Stock Transaction window in the Utilities drop-down menu of the INVENTORY Tab.