Overview:
OPTO can account for any number of non-productive activities, such as sick leave, annual and long service leave, maintenance, training etc. The process uses ‘non-productive’ workcenters in conjunction with an internal job run each month or quarter.
The following will need to be set-up:
- A client record for the user’s own company that will not generate invoices.
- A ‘Non-productive’ workcenter for each type of ‘non-productive’ activity
- A ‘Non-productive’ Part containing all the workcenters on the “Labour” Tab
- A Production Order for the user’s company containing the ‘non-productive’ part
Steps for setup:
Step 1
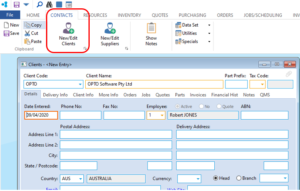
Set-up a new client record for your own company in the ‘Client Details’ window in the CONTACTS tab, press <F9> to save.
As no invoices are required for this client, the user needs to set a parameter – Click on INVOICING tab and click on the little arrow circled below to open the parameters for the invoice functions. On the “General” tab, enter your company’s client code in the “Create No Invoice” field and click on the tick box as shown below.
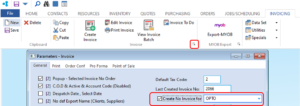
When ticked this option will despatch, but not invoice production orders for this client (your own company).
Step 2
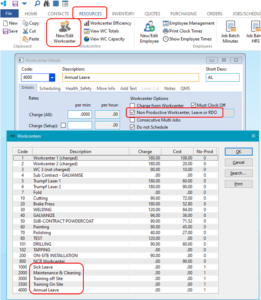
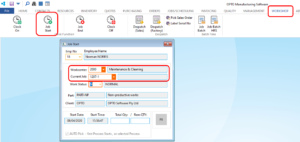
The USER needs to create a series of workcenters that will be used to clock or record time against the entries for non-productive activities. Open the RESOUCES tab and then click on the ‘New/Edit Workcenter’ icon and create the workcenters for the required activities as per the example below, press <F9> to save each workcenter.
Step 3
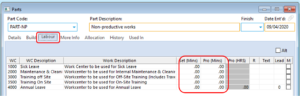
Create a “Part Code” for non-productive works, leave the all the boxes circled below un-ticked.
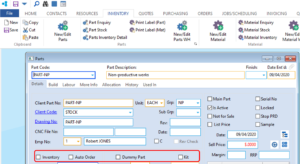
Do not enter any data on the “Build” tab of the part as no materials codes are used. Click on the “Labour” tab to open and enter all the non-productive workcenters as shown below, do not enter time in either the “Setup” and “Process” fields. Press <F9> to save.
Step 4
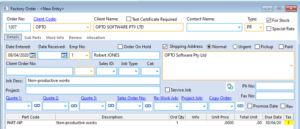
Create a new factory order for your own company and insert the “Non-Productive Part” as a quantity of one, press <F9> to save the order.
Open the ‘Process Sheet (Factory)’ window, click on the ‘Create Job Ticket(s)’ icon, and create a job ticket for the non-productive work and then click on the ‘Active Job’ icon. Circulate the job ticket to all staff responsible for administering and recording non-productive activities.
Create a factory order and activate the job at the start of each period (month or quarter) so that time can be clocked (batch entry or clock computer) against these activities. At the end of the period complete the job and despatch it out of the system. This will record the time and job costing for each non-productive activity.
How to make a Job Entry using the Clocking Function
If an employee is required to perform maintenance duties, or cleaning work in the factory, they can simply clock onto and off the created non-productive workcenter and job ticket as they would any normal workcenter and job. The employee opens the WORKSHOP tab and clock on for the day as normal. Then they click on the ‘Job Start’ icon enter their employee number and then the Workcenter for the activity from the drop-down list. Click on the drop-down for the Current Job to display the active job tickets for that workcenter. Select the job ticket and complete the rest of the fields as normal.
Create Batch Entry for Non-Productive Activity
Open the RESOURCES tab and select ‘Job Batch HRS’. Enter the job tick number for the non-productive activity and the required workcenter. For this example the entry is for a full day of annual leave. Enter the date and then the employee’s normal start and finish times are automatically populated from the shift in their employee record. Enter the Total Work Time in the NT column and then click on the save icon at the top right of the window.

OPTO Software Pty Ltd
Created: 23/09/2022