How to Use Merge Fields in Your Word Template
OPTO offers a feature for users to implement their own template designs when printing various forms within the program. These can be set up in Word and OPTO will fill in the rest. Click this links to see some example templates:
- InvoiceTemplate_Example_1
- InvoiceTemplate_Example_2
- QuoteTemplate_Example_1
- PurchaseTemplate_Example_1
- ProFormaTemplate_Example_1
Step 1: Open the Template with Merge Fields
Open the provided template:
- Invoice_AvailableMergeFields
- Quote_AvailableMergeFields
- Purchase_AvailableMergeFields
- DeliveryDocket_AvailableMergeFields
- ProForma_AvailableMergeFields
This file contains all the merge fields you can use.
Why This Step Is Important
Even though you may see the field name (like «QuoteNumber»), you can’t just type it yourself. These fields contain special hidden codes behind the scenes that make them work.
⚠️ If you type the field manually, it will not work.
Step 2: Copy a Merge Field into Your Template
- Highlight the field you want to use (e.g., «ClientName»).
- Right-click and choose Copy (or press Ctrl + C).
- Open your own template (or a copy of it).
- Place your cursor where the field should go.
- Right-click and choose Paste (or press Ctrl + V).
That’s it! You’ve inserted a working merge field.
Step 3: Save Your Template
- Save the file as a .docx file.
- Make sure the file doesn’t have any typed «FieldName» values — only pasted fields from the list.
- Upload it into the system when you’re done.
Common Mistakes to Avoid
| ❌ Incorrect | ✅ Correct |
|---|---|
| Typing «ClientName» yourself | Pasting it from the list |
| Using the wrong curly quotes like <> | Use Word’s built-in merge fields |
| Forgetting to include «TableStart:LineItem» or «TableEnd:LineItem» | Always wrap repeating tables with those fields |
Special Notes for Tables (e.g., Quotes or Line Items)
If your document has a table with repeating items (like parts or line items), you must:
- Add «TableStart:LineItem» at the beginning of the row.
- Add «TableEnd:LineItem» at the end of the row.
- Only paste these from the example template.
🧠 Why is there only one line in the table?
Even though your form (like an invoice or quote) may have multiple line items, your template only needs one row for the table. At runtime, the system will duplicate that row automatically for each line item in the order. This means you only need to design one row, and we’ll handle the rest.
Adding Your Own Content and Formatting
You are welcome to fully customize the layout and formatting of your template. The system will only replace the merge fields — everything else is up to you!
- Your company logo (Insert > Pictures)
- Custom fonts and font sizes
- Headers and footers
- Bold, italics, underlining, and colored text
- Page breaks, sections, and tables
- Terms and Conditions or Notes
- Signature lines or approval sections
📷 Adding a Company Logo
- Click where you want to place your logo.
- Go to the ‘Insert’ tab in Word.
- Click ‘Pictures’ and choose your logo image.
- Resize and position it as needed.
Tip: Place your logo in the header for consistency on every page.
📝 Adding Terms and Conditions
- Scroll to the end of your document.
- Add a heading like ‘Terms and Conditions’.
- Paste in your terms or legal disclaimers.
- Use bullets, bold text, or tables to make it easy to read.
🖋 Signature or Approval Section
You can add a place for your team or clients to sign printed documents:
- Add a table with ‘Approved by’, ‘Date’, and signature lines.
- Include merge fields like «POAuthorisedBy» if needed.
📄Adding a Page Number to the Bottom of the Page
-
- Open your Word template.
- Double-click the footer area at the bottom of the page. This will open the footer for editing.
- Go to the Insert tab at the top of Word.
- Click Quick Parts > Field.
- In the list that appears:
- Select “Page” and click OK to insert the current page number.
- Type ” of “
- Again, go to Quick Parts > Field.
- Select “NumPages” and click OK to insert the total page count.
You should now see something like this in your footer:
Page 1 of 1
When the document is generated, these numbers will automatically update based on the actual number of pages.
Uploading Templates into the System
Once you’ve finished editing your template, you can upload it into the system so it can be used for generating PDF documents. if maintained, the document format can differ by Division.
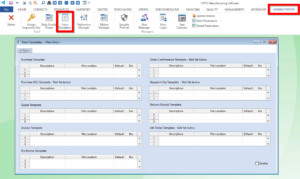
How to Upload a Template
- Go to the RESOURCES tab and click ‘Form Templates’.
- Find the relevant section for your document type (e.g., Quote Template, Purchase Template, etc.).
- Enter a name in the Description column.
- Double-click the File Location column to browse and select your saved .docx file.
- Type “Yes” in the ‘Default’ column if you want this to be the default template for this type.
- Make sure the ‘Enable’ checkbox in the bottom right corner of the screen is ticked.
How to Use a Template When Printing
- Select to print within the relevant window.
- A template choice window will appear. Select the template you want to use from the dropdown.
- Click Confirm to proceed with printing.
